<?xml version="1.0" encoding="utf-8"?><feed xmlns="http://www.w3.org/2005/Atom" ><generator uri="https://jekyllrb.com/" version="3.10.0">Jekyll</generator><link href="/feed.xml" rel="self" type="application/atom+xml" /><link href="/" rel="alternate" type="text/html" /><updated>2026-01-25T23:14:12+00:00</updated><id>/feed.xml</id><title type="html">The Nothingness of Scott</title><subtitle>jwir3&apos;s blog on software, kung fu, sailing, brewing, hockey, and everything else</subtitle><entry><title type="html">Happy Publishing Day</title><link href="/happy-publishing-day" rel="alternate" type="text/html" title="Happy Publishing Day" /><published>2024-10-01T06:00:00+00:00</published><updated>2024-10-01T06:00:00+00:00</updated><id>/happy-publishing-day</id><content type="html" xml:base="/happy-publishing-day"><![CDATA[<p><a href="https://www.sinkingmoon.org/press">Sinking Moon Press</a> has officially published its first book, <em>The Kunlun Secret</em>, which I edited, available on Amazon.com right now:</p>

<center><iframe type="text/html" sandbox="allow-scripts allow-same-origin allow-popups" width="336" height="550" frameborder="0" allowfullscreen="" style="max-width:100%" src="https://read.amazon.com/kp/card?asin=B0DGQ61WWP&amp;preview=inline&amp;linkCode=kpe&amp;ref_=kip_embed_taf_preview_5YSFGXMQXDVMMFWFNBXJ&amp;tag=mobilea08520a-20"></iframe></center>

<p>I thought it would be useful to add a couple of notes on the process we went through when publishing this - some “lessons learned,” if you will. I didn’t start out to form a publishing company, but when this opportunity presented itself, I thought it might be a good way to organically grow some funding for the Sinking Moon Foundation, a 501c(3) non-profit.</p>

<p>I approached this from an author’s perspective. That is, I asked myself the question “What is the biggest obstacle to authors getting their work out in the world?” Anyone can self-publish, which, in a sense, is exactly what Sinking Moon Press is starting out as - a glorified self-publishing organization. Some things a first-time author might not know about this process, though, caught me off guard:</p>

<ol>
  <li><strong>There really isn’t a great way to format your book in the formats that are necessary for Amazon to show it with all its features on your Kindle</strong> Amazon doesn’t really use epub formats. You can send an epub to your Kindle, but it won’t have a cover. Further, a number of the nice things besides the text will be removed. This is unfortunate, because epub is a standard, and is thus interchangeable between multiple e-readers, as well as mobile phones. Amazon actually uses a proprietary format called azw, which epub books are converted to before being sent to a Kindle device.</li>
  <li>
    <p><strong>Cover art is cheap, but only if you don’t want original stuff</strong> Fiverr is a great place to get a cover designed, but if you look at the notes for most of those cover designs, they often come with multiple “licensed stock images,” which means the author uses a photo and mocks it up in the way you want. I didn’t realize until I started looking at book covers how many authors now use this format - take an image of a person, make them look like they’re engaged in some magical or sci-fi activity, add a generic background and some stylized text on top of it, and it’s a book cover. I don’t mind these covers, I just think they are a little too “cookie cutter” for me, personally.</p>

    <p>We took a different route - utilizing a watercolor painting, digitally editing it to make it represent the right central idea we’re focusing on with the book, and then adding stylized text on top of it. Now that I look at it again, it looks somewhat plain, to be honest, but it was a learning experience that I enjoyed.</p>
  </li>
  <li><strong>Adding the “extra” stuff to a book, like Author’s Notes, Preface, Copyright Pages, Acknowledgements,  and Afterword, isn’t as easy as one would like</strong> This sort of comes along the same lines as formatting, above, but one thing that bit us was that adding text in tables, adding images, adding footnotes, and specific font formatting, wasn’t really supported in Amazon’s Kindle format. (That is, unless we gave up the reflowability of our text, which, of course, was a no-go). Adding specific fonts to the book wasn’t really supported, either. Getting things to be aligned exactly was a pretty big chore, to be honest, and seems like a technical problem in need of solution.</li>
</ol>

<p>All in all, I would say that the writing of the book was probably only about half of the work necessary to get it to this point. All of the “extra” stuff was just as much work. I could see someone who is less technical than I am having a ton of difficulty with some of these things, and it’s only because I’ve worked in text flow for the web that I understand some of the reasons why things are the way they are (and how to get around them with some grace).</p>

<p>As such, we decided to create a (very) small publishing company - <strong>Sinking Moon Press</strong> - to hopefully help authors with some of these issues. If you’re interested in publishing a book with us, shoot me an email at <a href="mailto:scottj@sinkingmoon.com">scottj@sinkingmoon.com</a> and maybe we can work together to get your book out into the world!</p>]]></content><author><name>jwir3</name></author><category term="publishing" /><category term="books" /><category term="writing" /><summary type="html"><![CDATA[Sinking Moon Press has officially published its first book, The Kunlun Secret, which I edited, available on Amazon.com right now:]]></summary></entry><entry><title type="html">Keys to the Commit Castle</title><link href="/keys-to-the-commit-castle" rel="alternate" type="text/html" title="Keys to the Commit Castle" /><published>2023-07-23T06:00:00+00:00</published><updated>2023-07-23T06:00:00+00:00</updated><id>/keys-to-the-commit-castle</id><content type="html" xml:base="/keys-to-the-commit-castle"><![CDATA[<p>Cryptographically signing your git commits prevents another person from making commits to a repository in your name. I have a couple of examples where someone has committed code in my name (never maliciously), and it makes me uncomfortable. So, I’ve decided to sign all of my commits to git using a private/public keypair. I use a Yubikey for this, which is a piece of hardware that allows you, with a PIN, to perform signing, authentication, and encryption operations without being able to read private keys from the device (thus preventing someone from stealing your private keys).</p>

<p>Setting up your Yubikey is outside the scope of this post, but <a href="https://github.com/drduh/YubiKey-Guide">DrDuh has a great guide on githu</a> on how to set up a brand new Yubikey and start using it. What this post is about is signing git commits, conditionally, depending on whether your Yubikey is installed in your machine. Consider the following: You’ve set up a Yubikey with a set of signing, encryption, and authentication keys. You’ve also removed those private keys from your hard drive to prevent disclousure, as is recommended in DrDuh’s guide. Let’s suppose you have a computer at work and a laptop at home. Suppose you want to be able to sign your commits on each of your computers. This is a pretty easy thing to accomplish, assuming you have the configuration set up. All you have to do is move your Yubikey from one computer to another, right?</p>

<p>Well, now let’s say you left your Yubikey at work over the weekend (hopefully in a locked drawer and not physically in your machine where anyone could walk off with it). But, you want to work on work at home on your laptop. You go to commit your changes, and it asks you to insert your Yubikey. The following is a small script that checks to see if your Yubikey is present on the current machine, and if so, will sign your commits by aliasing <code class="language-plaintext highlighter-rouge">git commit</code> to <code class="language-plaintext highlighter-rouge">git commit -S</code>. If the key is not present, then it will simply use <code class="language-plaintext highlighter-rouge">git commit</code>. This is useful in a situation where you want to sign most of your commits, but it’s ok if you don’t sign some commits.</p>

<script src="https://gist.github.com/jwir3/b92d5f71d3ea541da8bfc81f6a492447.js"></script>

<p>What this script does is check for the signing key’s identifier. If it finds it, it will respond with the word <code class="language-plaintext highlighter-rouge">true</code>. If the signing key is not found, then it will respond with the word <code class="language-plaintext highlighter-rouge">false</code>. Take this script and place it into some location on your machine. Make it executable using <code class="language-plaintext highlighter-rouge">chmod a+x &lt;script path&gt;</code>.</p>

<p>Now, we’re going to use a <code class="language-plaintext highlighter-rouge">bash</code> function to alias <code class="language-plaintext highlighter-rouge">git</code>. Since <code class="language-plaintext highlighter-rouge">git</code> uses the subcommand pattern, we can’t just use alias in the same way we would if we wanted to add a flag to an <code class="language-plaintext highlighter-rouge">ls</code> command, for instance. Take the following and place it at the end of your <code class="language-plaintext highlighter-rouge">.bashrc</code> or <code class="language-plaintext highlighter-rouge">.zshrc</code> initialization file:</p>

<script src="https://gist.github.com/jwir3/ed2eac850f62915473817ee7396ba13b.js"></script>

<p>Use <code class="language-plaintext highlighter-rouge">source</code> to read the file into your current shell: <code class="language-plaintext highlighter-rouge">source ~/.bashrc</code>, and voila! You now will be able to conditionally sign commits. Don’t forget to add the ID of your signing key to your global gitconfig using:</p>

<div class="language-plaintext highlighter-rouge"><div class="highlight"><pre class="highlight"><code>git config --global user.signingkey $KEYID
</code></pre></div></div>

<p>If you don’t have the key id anymore, you can retrieve it using:</p>

<div class="language-plaintext highlighter-rouge"><div class="highlight"><pre class="highlight"><code>gpg --list-secret-keys --keyid-format=0xshort
</code></pre></div></div>

<p>You’re looking for the line that says something like:</p>

<div class="language-plaintext highlighter-rouge"><div class="highlight"><pre class="highlight"><code>sec#  rsa4096/0xABCDEF01 2023-06-20 [C]
</code></pre></div></div>

<p>This <code class="language-plaintext highlighter-rouge">0xABCDEF01</code> is your key id.</p>

<p>Happy Signing!</p>]]></content><author><name>jwir3</name></author><category term="Engineering" /><category term="Yubikey" /><category term="Software Development" /><category term="git" /><summary type="html"><![CDATA[Cryptographically signing your git commits prevents another person from making commits to a repository in your name. I have a couple of examples where someone has committed code in my name (never maliciously), and it makes me uncomfortable. So, I’ve decided to sign all of my commits to git using a private/public keypair. I use a Yubikey for this, which is a piece of hardware that allows you, with a PIN, to perform signing, authentication, and encryption operations without being able to read private keys from the device (thus preventing someone from stealing your private keys).]]></summary></entry><entry><title type="html">Inappropriate IOCTL</title><link href="/inappropriate-ioctl" rel="alternate" type="text/html" title="Inappropriate IOCTL" /><published>2023-02-07T06:00:00+00:00</published><updated>2023-02-07T06:00:00+00:00</updated><id>/inappropriate-ioctl</id><content type="html" xml:base="/inappropriate-ioctl"><![CDATA[<p>I recently encountered a problem that I’ve had in the past, so I thought I would make a post to
remind (mostly myself) how I finally solved it. This helps me avoid a groundhog day situation where
I continually make the same mistake and don’t remember how I fixed it, since I didn’t document it
properly.</p>

<h2 id="the-setup">The Setup</h2>
<p>We have a Rails app that deploys using Capistrano. As we merge to our develop and main branches, we
also have a GitHub actions runner that will perform deployments (assuming the build works and tests
pass). So, our setup looks something like this:</p>

<pre><code class="language-mermaid">flowchart LR

    ldm[Local Development Machine]
    ghr[Github Runner]
    stage[stage.example.com]
    ldm --&gt;|push to develop|ghr
    ghr --&gt;|capistrano via ssh|stage
</code></pre>

<p>Capistrano runs through <code class="language-plaintext highlighter-rouge">ssh</code>, where it connects to GitHub to download the repository. Because this is running in an automated environment, we need to use an SSH key instead of a password to authenticate (we’ll see why in just a second).</p>

<p>The file that controls how the deployment works is pretty simple. It’s contained in <code class="language-plaintext highlighter-rouge">config/deploy/staging.rb</code>, and looks like this:</p>

<div class="language-ruby highlighter-rouge"><div class="highlight"><pre class="highlight"><code><span class="n">set</span> <span class="ss">:stage</span><span class="p">,</span> <span class="ss">:staging</span>

<span class="n">set</span> <span class="ss">:bundle_without</span><span class="p">,</span> <span class="s1">'test'</span>

<span class="n">set</span> <span class="ss">:rails_env</span><span class="p">,</span> <span class="n">fetch</span><span class="p">(</span><span class="ss">:staging</span><span class="p">)</span>

<span class="n">set</span> <span class="ss">:use_sudo</span><span class="p">,</span> <span class="kp">false</span>

<span class="n">set</span> <span class="ss">:deploy_to</span><span class="p">,</span> <span class="s1">'/var/www/example.com/stage.api.example.com'</span>

<span class="n">server</span> <span class="s2">"stage.api.example.com"</span><span class="p">,</span> <span class="ss">user: </span><span class="s2">"deployer-bot"</span><span class="p">,</span> <span class="ss">roles: </span><span class="sx">%w{web app db}</span>

<span class="n">set</span> <span class="ss">:branch</span><span class="p">,</span> <span class="no">ENV</span><span class="p">[</span><span class="s2">"REVISION"</span><span class="p">]</span> <span class="o">||</span> <span class="no">ENV</span><span class="p">[</span><span class="s2">"BRANCH_NAME"</span><span class="p">]</span> <span class="o">||</span> <span class="s2">"develop"</span>

<span class="n">set</span> <span class="ss">:ssh_options</span><span class="p">,</span> <span class="p">{</span>
  <span class="ss">keys: </span><span class="sx">%w(~/.ssh/id_rsa)</span><span class="p">,</span>
  <span class="ss">forward_agent: </span><span class="kp">true</span><span class="p">,</span>
<span class="p">}</span>
</code></pre></div></div>

<p>Now, when I run <code class="language-plaintext highlighter-rouge">bundle exec cap staging deploy</code> locally, it deploys to the server <code class="language-plaintext highlighter-rouge">stage.api.example.com</code> and places the revision in the <code class="language-plaintext highlighter-rouge">/var/www/example.com/stage.api.example.com</code> directory.</p>

<p>When we add GitHub actions into the mix, though, things get a little dicey. My GitHub actions definition file, located in <code class="language-plaintext highlighter-rouge">.github/workflows/staging.yml</code>, looks like this:</p>

<div class="language-yaml highlighter-rouge"><div class="highlight"><pre class="highlight"><code><span class="na">name</span><span class="pi">:</span> <span class="s">Build, Test, and Deploy to Staging</span>

<span class="na">on</span><span class="pi">:</span>
  <span class="na">push</span><span class="pi">:</span>
    <span class="na">branches</span><span class="pi">:</span>
      <span class="pi">-</span> <span class="s">develop</span>
  <span class="c1"># Allows you to run this workflow manually from the Actions tab</span>
  <span class="na">workflow_dispatch</span><span class="pi">:</span>
<span class="na">jobs</span><span class="pi">:</span>
  <span class="na">build-and-test</span><span class="pi">:</span>
    <span class="na">runs-on</span><span class="pi">:</span> <span class="s">ubuntu-latest</span>
    <span class="na">env</span><span class="pi">:</span>
      <span class="na">DB_DATABASE</span><span class="pi">:</span> <span class="s">stage_db</span>
      <span class="na">DB_ROOT_USER</span><span class="pi">:</span> <span class="s">root</span>
      <span class="na">DB_ROOT_PASSWORD</span><span class="pi">:</span> <span class="s">root</span>
      <span class="na">DB_USER</span><span class="pi">:</span> <span class="s">eample_admin</span>
      <span class="na">DB_PASSWORD</span><span class="pi">:</span> <span class="s">$</span>
    <span class="na">steps</span><span class="pi">:</span>
      <span class="pi">-</span> <span class="na">name</span><span class="pi">:</span> <span class="s">Set up MySQL</span>
        <span class="na">run</span><span class="pi">:</span> <span class="pi">|</span>
          <span class="s">sudo systemctl start mysql.service</span>
          <span class="s">mysql -e 'CREATE DATABASE $;' -u$ -p$</span>
          <span class="s">mysql -e "CREATE USER '$'@'localhost' IDENTIFIED BY '$';" -u$ -p$</span>
          <span class="s">mysql -e "CREATE DATABASE IF NOT EXISTS $;" -u$ -p$</span>
          <span class="s">mysql -e "GRANT ALL PRIVILEGES ON $.* to '$'@'localhost';" -u$ -p$</span>
          <span class="s">mysql -e "FLUSH PRIVILEGES;" -u$ -p$</span>
      <span class="pi">-</span> <span class="na">name</span><span class="pi">:</span> <span class="s">Install SSH key to Server</span>
        <span class="na">uses</span><span class="pi">:</span> <span class="s">shimataro/ssh-key-action@v2</span>
        <span class="na">with</span><span class="pi">:</span>
          <span class="na">key</span><span class="pi">:</span> <span class="s">$</span>
          <span class="na">name</span><span class="pi">:</span> <span class="s">github-actions</span>
          <span class="na">known_hosts</span><span class="pi">:</span> <span class="s">$</span>
          <span class="na">config</span><span class="pi">:</span> <span class="pi">|</span>
            <span class="s">host stage.api.example.com</span>
            <span class="s">IdentityFile ~/.ssh/github-actions</span>
            <span class="s">IdentitiesOnly yes</span>
            <span class="s">ForwardAgent yes</span>
      <span class="pi">-</span> <span class="na">name</span><span class="pi">:</span> <span class="s">Verify SSH Key</span>
        <span class="na">run</span><span class="pi">:</span> <span class="s">cat ~/.ssh/github-actions</span>
      <span class="pi">-</span> <span class="na">uses</span><span class="pi">:</span> <span class="s">actions/checkout@v2</span>
      <span class="pi">-</span> <span class="na">name</span><span class="pi">:</span> <span class="s">Set up Ruby Environment</span>
        <span class="na">uses</span><span class="pi">:</span> <span class="s">ruby/setup-ruby@v1</span>
        <span class="na">with</span><span class="pi">:</span>
          <span class="na">ruby-version</span><span class="pi">:</span> <span class="s">2.6.1</span>
          <span class="c1"># runs 'bundle install' and caches installed gems automatically</span>
          <span class="na">bundler-cache</span><span class="pi">:</span> <span class="no">true</span>
        <span class="na">env</span><span class="pi">:</span>
          <span class="na">RAILS_ENV</span><span class="pi">:</span> <span class="s">staging</span>
      <span class="pi">-</span> <span class="na">name</span><span class="pi">:</span> <span class="s">Setup Database</span>
        <span class="na">env</span><span class="pi">:</span>
          <span class="na">RAILS_ENV</span><span class="pi">:</span> <span class="s">staging</span>
        <span class="na">run</span><span class="pi">:</span> <span class="s">bundle exec rake db:setup</span>
      <span class="pi">-</span> <span class="na">name</span><span class="pi">:</span> <span class="s">Perform Database Migrations</span>
        <span class="na">env</span><span class="pi">:</span>
          <span class="na">RAILS_ENV</span><span class="pi">:</span> <span class="s">staging</span>
        <span class="na">run</span><span class="pi">:</span> <span class="s">bundle exec rake db:migrate</span>
      <span class="pi">-</span> <span class="na">name</span><span class="pi">:</span> <span class="s">Run specs</span>
        <span class="na">env</span><span class="pi">:</span>
          <span class="na">RAILS_ENV</span><span class="pi">:</span> <span class="s">staging</span>
        <span class="na">run</span><span class="pi">:</span> <span class="s">bundle exec rails spec</span>
  <span class="na">deploy-staging</span><span class="pi">:</span>
    <span class="na">needs</span><span class="pi">:</span> <span class="s">build-and-test</span>
    <span class="na">runs-on</span><span class="pi">:</span> <span class="s">ubuntu-latest</span>
    <span class="na">steps</span><span class="pi">:</span>
      <span class="pi">-</span> <span class="na">name</span><span class="pi">:</span> <span class="s">Install SSH Host Key</span>
        <span class="na">uses</span><span class="pi">:</span> <span class="s">shimataro/ssh-key-action@v2</span>
        <span class="na">with</span><span class="pi">:</span>
          <span class="na">key</span><span class="pi">:</span> <span class="s">$</span>
          <span class="na">name</span><span class="pi">:</span> <span class="s">github-actions</span>
          <span class="na">known_hosts</span><span class="pi">:</span> <span class="s">$</span>
          <span class="na">config</span><span class="pi">:</span> <span class="pi">|</span>
            <span class="s">Host stage.api.example.com</span>
            <span class="s">IdentityFile ~/.ssh/github-actions</span>
            <span class="s">IdentitiesOnly yes</span>
            <span class="s">ForwardAgent yes</span>
      <span class="pi">-</span> <span class="na">uses</span><span class="pi">:</span> <span class="s">actions/checkout@v2</span>
      <span class="pi">-</span> <span class="na">name</span><span class="pi">:</span> <span class="s">Set up Ruby</span>
        <span class="na">uses</span><span class="pi">:</span> <span class="s">ruby/setup-ruby@v1</span>
        <span class="na">with</span><span class="pi">:</span>
          <span class="c1">#          # NOTE: This is not needed since we have a .ruby-version file.</span>
          <span class="c1">#          # ruby-version: 2.6.1</span>
          <span class="na">bundler-cache</span><span class="pi">:</span> <span class="no">true</span> <span class="c1"># runs 'bundle install' and caches installed gems automatically</span>
      <span class="pi">-</span> <span class="na">name</span><span class="pi">:</span> <span class="s">Install SSH Key</span>
        <span class="na">run</span><span class="pi">:</span> <span class="pi">|</span>
          <span class="s">eval "$(ssh-agent -s)"</span>
          <span class="s">ssh-add -D</span>
          <span class="s">ssh-add ~/.ssh/github-actions</span>
      <span class="pi">-</span> <span class="na">name</span><span class="pi">:</span> <span class="s">Check SSH Key Viability</span>
        <span class="na">run</span><span class="pi">:</span> <span class="pi">|</span>
          <span class="s">echo "ls -al" | ssh deployer-bot@stage.api.example.com</span>
      <span class="pi">-</span> <span class="na">name</span><span class="pi">:</span> <span class="s">Deploy to staging</span>
        <span class="na">run</span><span class="pi">:</span> <span class="pi">|</span>
          <span class="s">eval "$(ssh-agent -s)"</span>
          <span class="s">ssh-add -D</span>
          <span class="s">ssh-add ~/.ssh/github-actions</span>
          <span class="s">bundle exec cap staging deploy</span>
</code></pre></div></div>

<p>There’s a lot going on here, but, essentially, we’re setting up an SSH key to the <code class="language-plaintext highlighter-rouge">stage.api.example.com</code> <em>server</em> (this becomes important in a second), checking the viability of that SSH key, setting up ruby, and finally deploying using Capistrano. The “Check SSH Key Viability” step is unnecessary now, but it was useful in debugging the underlying issue (up next).</p>

<h2 id="the-problem">The Problem</h2>
<p>Now, even though I was able to deploy to staging locally, when it attempted to deploy on Github actions, the following error was displayed during the <strong>Deploy to staging</strong> phase:</p>

<div class="language-plaintext highlighter-rouge"><div class="highlight"><pre class="highlight"><code>(stack trace garbage) `rescue in block (2 levels) in execute': Exception while executing as deployer-bot@stage.api.example.com: Inappropriate ioctl for device (SSHKit::Runner::ExecuteError)
    from /home/runner/work/api/api/vendor/bundle/ruby/2.6.0/gems/sshkit-1.21.3/lib/sshkit/runners/parallel.rb:11:in `block (2 levels) in execute'
/home/runner/work/api/api/vendor/bundle/ruby/2.6.0/gems/net-ssh-7.0.1/lib/net/ssh/prompt.rb:44:in `noecho': Inappropriate ioctl for device (Errno::ENOTTY)

... more garbage ...

(Backtrace restricted to imported tasks)
cap aborted!
SSHKit::Runner::ExecuteError: Exception while executing as deployer-bot@stage.api.example.com: Inappropriate ioctl for device


Caused by:
Errno::ENOTTY: Inappropriate ioctl for device

Tasks: TOP =&gt; rvm:hook =&gt; passenger:rvm:hook =&gt; passenger:test_which_passenger
(See full trace by running task with --trace)
deployer-bot@stage.api.example.com's password:
Error: Process completed with exit code 1.
</code></pre></div></div>

<p>I spent quite a bit of time trying to figure out what <strong>Inappropriate ioctl for device</strong> means. I’ll save you some time. It means: “I require input from a terminal and no terminal is attached to this device.” Had I seen the line near the bottom that says <code class="language-plaintext highlighter-rouge">deployer-bot@stage.api.example.com's password:</code>, I probably would’ve solved this a little faster, but I didn’t see that because I was too busy looking through the stack trace (which I’ve omitted for you for convienence).</p>

<h2 id="the-solution">The Solution</h2>
<p>What was happening was that on the GitHub runner, the SSH command to <code class="language-plaintext highlighter-rouge">stage.api.example.com</code> was working fine. What wasn’t working, though, was the step where Capistrano, on <code class="language-plaintext highlighter-rouge">stage.api.example.com</code>, was checking out the codebase <em>from GitHub</em>. This is because the public key for <code class="language-plaintext highlighter-rouge">deployer-bot@stage.api.example.com</code> was not registered with GitHub under my user account, nor was there a deploy key for it for the project in question.</p>

<p>So, it seems as though all we need to do is add a deploy key on GitHub for the appropriate repository with the contents of the file <code class="language-plaintext highlighter-rouge">id_rsa.pub</code> in the <code class="language-plaintext highlighter-rouge">.ssh</code> directory for <code class="language-plaintext highlighter-rouge">deployer-bot</code> on <code class="language-plaintext highlighter-rouge">stage.api.example.com</code>, right? Well, this didn’t work, either.</p>

<p>To complicate matters, on <code class="language-plaintext highlighter-rouge">stage.api.example.com</code>, the file <code class="language-plaintext highlighter-rouge">~/.ssh/config</code> for <code class="language-plaintext highlighter-rouge">deployer-bot</code> looked like this:</p>

<div class="language-plaintext highlighter-rouge"><div class="highlight"><pre class="highlight"><code>Host github.com
 HostName github.com
 IdentityFile ~/.ssh/github-actions
</code></pre></div></div>

<p>What this means is that for every host <em>except</em> GitHub, it was using the <code class="language-plaintext highlighter-rouge">id_rsa</code> file located in <code class="language-plaintext highlighter-rouge">~/.ssh</code>. For GitHub, though, it was using <code class="language-plaintext highlighter-rouge">github-actions</code>. This means that I needed to add a deploy key for <code class="language-plaintext highlighter-rouge">github-actions.pub</code> in this same directory. Believe it or not, this still wasn’t the complete answer!</p>

<p>Capistrano <em>also</em> needed to be told to use <code class="language-plaintext highlighter-rouge">github-actions</code>. Specifically, this line in the <code class="language-plaintext highlighter-rouge">config/deploy/staging.rb</code> file:</p>

<div class="language-ruby highlighter-rouge"><div class="highlight"><pre class="highlight"><code>  <span class="ss">keys: </span><span class="sx">%w(~/.ssh/id_rsa)</span><span class="p">,</span>
</code></pre></div></div>

<p>needed to be changed to this:</p>

<div class="language-ruby highlighter-rouge"><div class="highlight"><pre class="highlight"><code>  <span class="ss">keys: </span><span class="sx">%w(/.ssh/github-actions)</span><span class="p">,</span>
</code></pre></div></div>

<p>After that, magically, everything seemed to magically work.</p>

<h2 id="conclusion">Conclusion</h2>
<p>I hope documenting this helps you in the future. Quite honestly, I think it’s a pretty specific case of misconfiguration on my side (I know this because I also posted this on <a href="https://stackoverflow.com/questions/73252484/inappropriate-ioctl-for-device-when-using-capistrano-in-github-actions">StackOverflow</a> and didn’t get a response in the 6 months before I figured it out on my own). That said, documenting it here will at least help me to remember what was going on, and, maybe, just maybe, help someone else lost in a sea of SSH redirections.</p>]]></content><author><name>jwir3</name></author><category term="Engineering" /><category term="Rails" /><category term="Capistrano" /><summary type="html"><![CDATA[I recently encountered a problem that I’ve had in the past, so I thought I would make a post to remind (mostly myself) how I finally solved it. This helps me avoid a groundhog day situation where I continually make the same mistake and don’t remember how I fixed it, since I didn’t document it properly.]]></summary></entry><entry><title type="html">There’s No One Like Amy</title><link href="/theres-noone-like-amy" rel="alternate" type="text/html" title="There’s No One Like Amy" /><published>2022-06-09T20:55:00+00:00</published><updated>2022-06-09T20:55:00+00:00</updated><id>/theres-noone-like-amy</id><content type="html" xml:base="/theres-noone-like-amy"><![CDATA[<p>Want to know how to have a great marriage? I can’t tell you, sorry. But I can tell you about what
makes my wife special to me.</p>

<p>It happens to be Amy and I’s 10th wedding anniversary today. I think that’s pretty significant. When
I told someone this week about this fact, they asked me, “What does it take to have a relationship
last that long?” Honestly, I have no idea, because it’s my opinion that every relationship is
different and unique, so that question probably can’t be answered in a general way.</p>

<p>What I can tell you is a few things about our marriage. It’s not perfect - we have arguments and
disagreements just like everyone else. Since we’re in the middle of starting a business right now,
some of those arguments can get pretty heated. Regardless, the bond between my wife and I is very
strong, and, in honor of our wedding anniversary, I want to share five things that I find amazing
about Amy:</p>

<h2 id="she-always-puts-me-and-our-kids-before-herself">She always puts me and our kids before herself</h2>
<p>Seriously. Always. Whenever we have dinner, she always serves herself last (if she’s serving the
food). If she goes to get a cup of coffee from the store, she’ll bring back one for me even without
me asking. She simply doesn’t EVER think only of herself. Obviously, this trait benefits me, but
really I think what I love the most is that I can’t seem to ever be at that level of selflessness,
so I respect this in that it shows me how to be a better version of myself.</p>

<h2 id="she-is-incredibly-thoughtful">She is incredibly thoughtful</h2>
<p>Amy will go out of her way to make your day special. It’s not just for me - she remembers birthdays
anniversaries, special events, even small things like what your favorite flavor of ice cream is. Any
event, gift, even just random “pick-me-up” she has a hand in planning will have an extra personal
touch. She has an intricate way of making sure that everything is just right.</p>

<h2 id="she-doesnt-hold-on-to-grudges">She doesn’t hold on to grudges</h2>
<p>This sounds like a negative aspect, but I’ve known a lot of people that hold on to things long after
they should let it go (cough me cough). Amy doesn’t do this. When an argument is complete - that’s
it - it’s done. Now we move on and life goes back to the way things were, usually with slight
changes to make things better (see the last point). I’m pretty neurotic, bordering on unreasonable
at times, and Amy’s able to see through that and move on with life, even if I’m critical of her.</p>

<h2 id="she-does-a-bunch-of-the-things-i-cant-or-dont-want-to-handle">She does a bunch of the things I can’t or don’t want to handle</h2>
<p>I can’t tell you how much it means to me that I don’t have to argue on the phone with people. Amy
handles billing inquiries, disputes, scheduling contractors when we need them, doctor’s
appointments, and a whole host of other things that would otherwise either slip my mind or not get
done because I hate doing them. This relieves a ton of stress in my life, and I am exceedingly
thankful that she takes this on so I don’t have to.</p>

<h2 id="she-grows-and-changes-herself-for-the-better">She grows and changes herself for the better</h2>
<p>I actually didn’t put this one in originally, because it sounds like I’m trying to change another
human being, but I think it’s to her credit to add it, so I’m going to keep it here. Whenever we
have an argument or something bad happens that she realizes was a result of something she did (or
didn’t do), Amy adapts and learns from that. This is human nature. However, if you’ve ever heard the
adage “a leopard doesn’t change its spots”, it means that people tend to be stuck in a state and
won’t change. Amy’s the opposite - she’ll actually change herself for the better in noticeable ways.
No-one is perfect, but what I admire about Amy is that she strives to be better than she was
yesterday. I often strive to grow because I see this in another person that I’m close to, and I
respect this trait and want to emulate it.</p>

<h2 id="bonus-shes-absolutely-committed-to-our-family">Bonus: She’s absolutely committed to our family</h2>
<p>I have to say this, because it’s completely true - I have absolute certainty in our marriage and
Amy’s commitment to our family. I am so humbled by the fact that I am married to a woman who I know
will stay by my side no matter what - literally through everything. I have no question about her
devotion to me or our kids. This is something that I think others might take for granted, and I want
to be clear that I don’t take this for granted at all. Devotion to others is, in my opinion, a
selfless act that needs to be called out and praised.</p>

<p>So, in short, Amy, I love you and I wish you the happiest 10th anniversary in the world. I hope you
and I have many more years together just like these last 10 years and that we can instill some of
these amazing traits into our kids and others around us.</p>]]></content><author><name>jwir3</name></author><category term="Marriage" /><category term="Relationships" /><summary type="html"><![CDATA[Want to know how to have a great marriage? I can’t tell you, sorry. But I can tell you about what makes my wife special to me.]]></summary></entry><entry><title type="html">Writing (Another) Avatar Service</title><link href="/writing-another-avatar-service" rel="alternate" type="text/html" title="Writing (Another) Avatar Service" /><published>2022-02-23T06:00:00+00:00</published><updated>2022-02-23T06:00:00+00:00</updated><id>/writing-another-avatar-service</id><content type="html" xml:base="/writing-another-avatar-service"><![CDATA[<p>This story probably sounds familiar: you are in the middle of implementing a new webapp, writing th
code necessary to support user profiles. You realize that you want to support user avatars (because
users absolutely want to be able to choose their avatar), but you don’t want to create and maintain
a service just to host images of users.</p>

<p>You could use <a href="www.gravatar.com">Gravatar</a>, but the problem with this is that Gravatar requires that
users upload their avatars using the Gravatar website and doesn’t allow you to provide your users a
convenient upload mechanism directly from within their profile on your app.</p>

<p>After having written 3 or 4 of these myself, I realized they basically take the same form. So, when
I was faced with this problem again with my current project, I decided I wanted to write a single,
self-contained microservice that could be reusable whenever I (or someone else) needed it. This also
gave me a chance to write a web service in Rust and to renew some of my skills with Docker.</p>

<p>Enter <a href="https://github.com/FoamFactory/archetype">Archetype</a>. This is a small service designed to
provide avatars that you can use for your web app. It has a very simple
<a href="https://app.swaggerhub.com/apis-docs/FoamFactory/Archetype/1.0.0">API</a> that can be used with both
image/jpeg and image/png files. To set it up, perform the following on your server that has the
docker daemon running:</p>

<div class="language-shell highlighter-rouge"><div class="highlight"><pre class="highlight"><code>git clone git@github.com:FoamFactory/archetype
<span class="nb">cd </span>archetype

<span class="c"># Edit docker-compose.yml to assign the ALLOWED_HOSTS variable properly.</span>
<span class="c"># Since this is the only security level available right now, you must</span>
<span class="c"># specify at least one IP address for machines you want to be able to</span>
<span class="c"># access the avatar service.</span>

docker-compose up <span class="nt">-d</span>
</code></pre></div></div>

<p>Yup, that’s it! If you want, I’ll even set it up for you and maintain it, for $36/year (slightly
more if you want me to setup a Linode instance that you can own and maintain yourself). Just sent me
a quick email at <code class="language-plaintext highlighter-rouge">scott{at}jwir3.com</code> and I’ll take care of it for you. And, of course, patches are
accepted for things that need changing.</p>

<p>Hopefully, this saves you time in the future from having to re-write avatar services from scratch
every time you create a new app that requires them.</p>]]></content><author><name>jwir3</name></author><category term="Engineering" /><category term="Software Development" /><category term="Web Services" /><summary type="html"><![CDATA[This story probably sounds familiar: you are in the middle of implementing a new webapp, writing th code necessary to support user profiles. You realize that you want to support user avatars (because users absolutely want to be able to choose their avatar), but you don’t want to create and maintain a service just to host images of users.]]></summary></entry><entry><title type="html">Getting Frame Data from Chrome Devtools for Devtools</title><link href="/getting-frame-data-from-chrome-devtools-for-devtools" rel="alternate" type="text/html" title="Getting Frame Data from Chrome Devtools for Devtools" /><published>2022-01-06T06:00:00+00:00</published><updated>2022-01-06T06:00:00+00:00</updated><id>/getting-frame-data-from-chrome-devtools-for-devtools</id><content type="html" xml:base="/getting-frame-data-from-chrome-devtools-for-devtools"><![CDATA[<p>I’ll let you in on a little secret: Chrome’s devtools are essentially just another webapp. This
means that you can check out data from the devtools in another devtools instance.</p>

<h3 id="problem-statement">Problem Statement</h3>
<p>The reason this article came to be is that a current client of mine is developing a benchmark engine
for our rendering code. As part of this, we want to see if the measurements line up (at least
somewhat, it doesn’t have to be super accurate) with what we’re seeing when we take performance
measurements manually through Chrome’s devtools.</p>

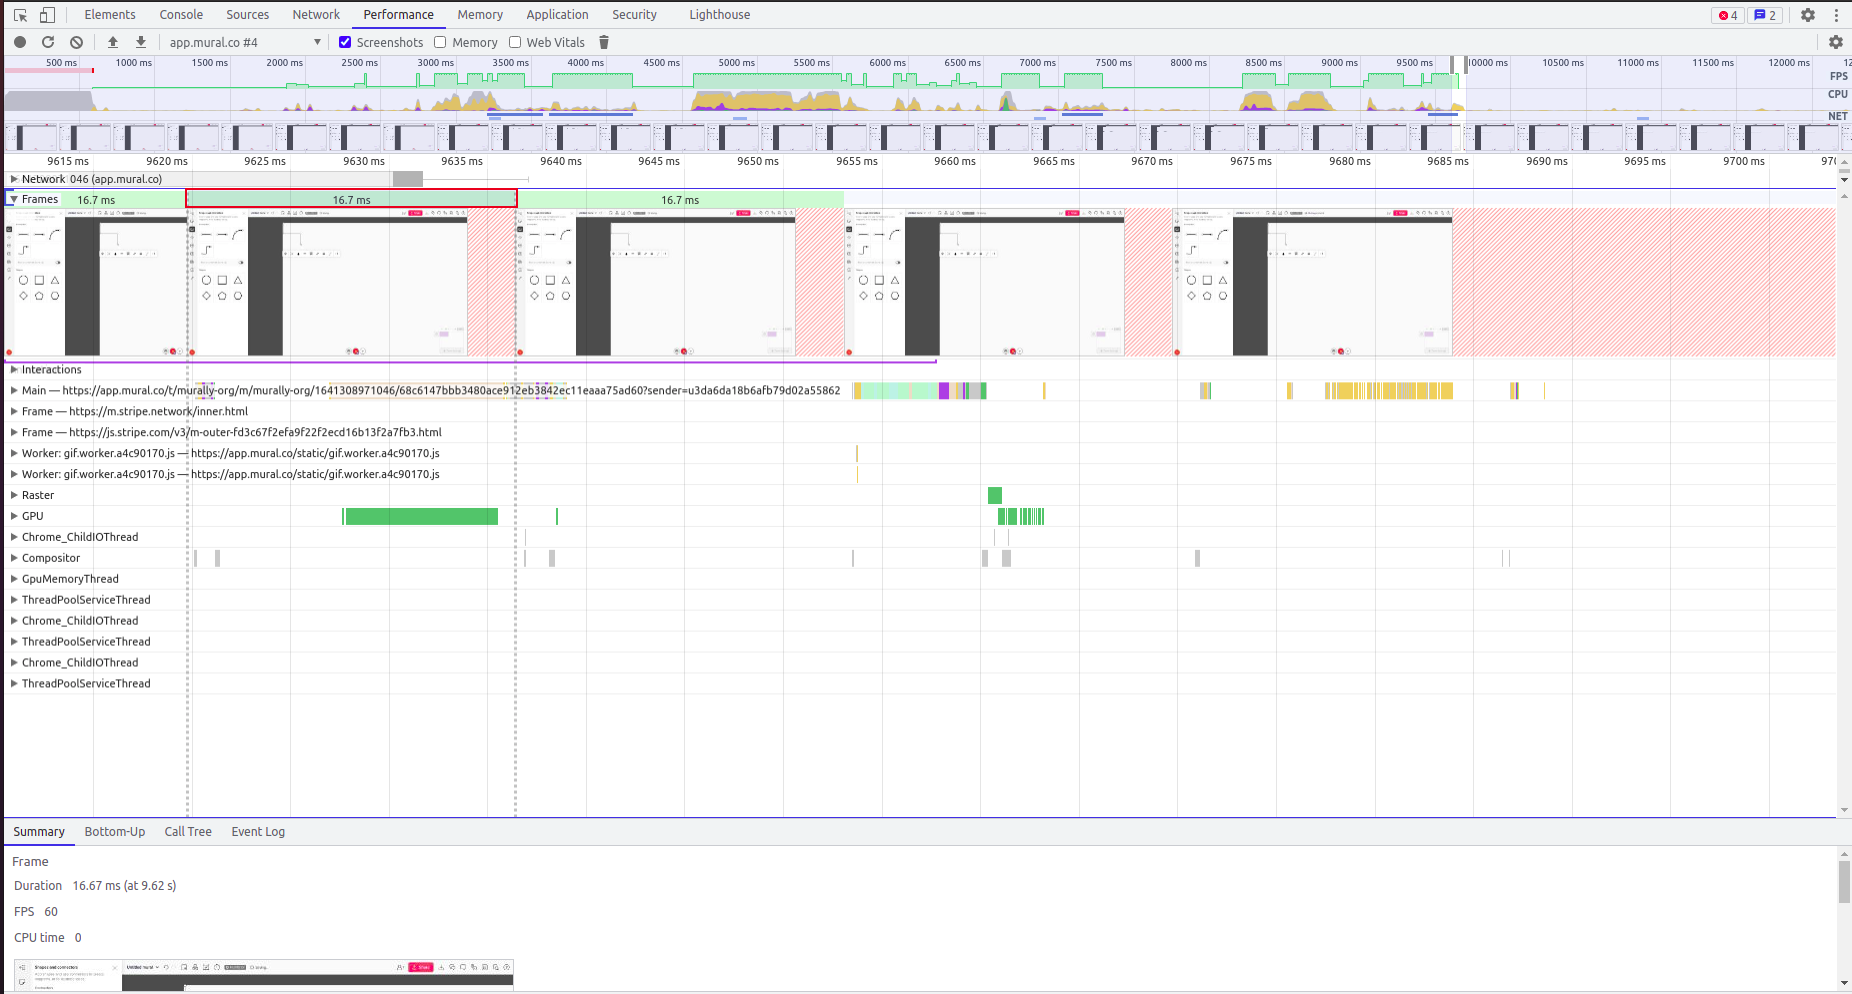
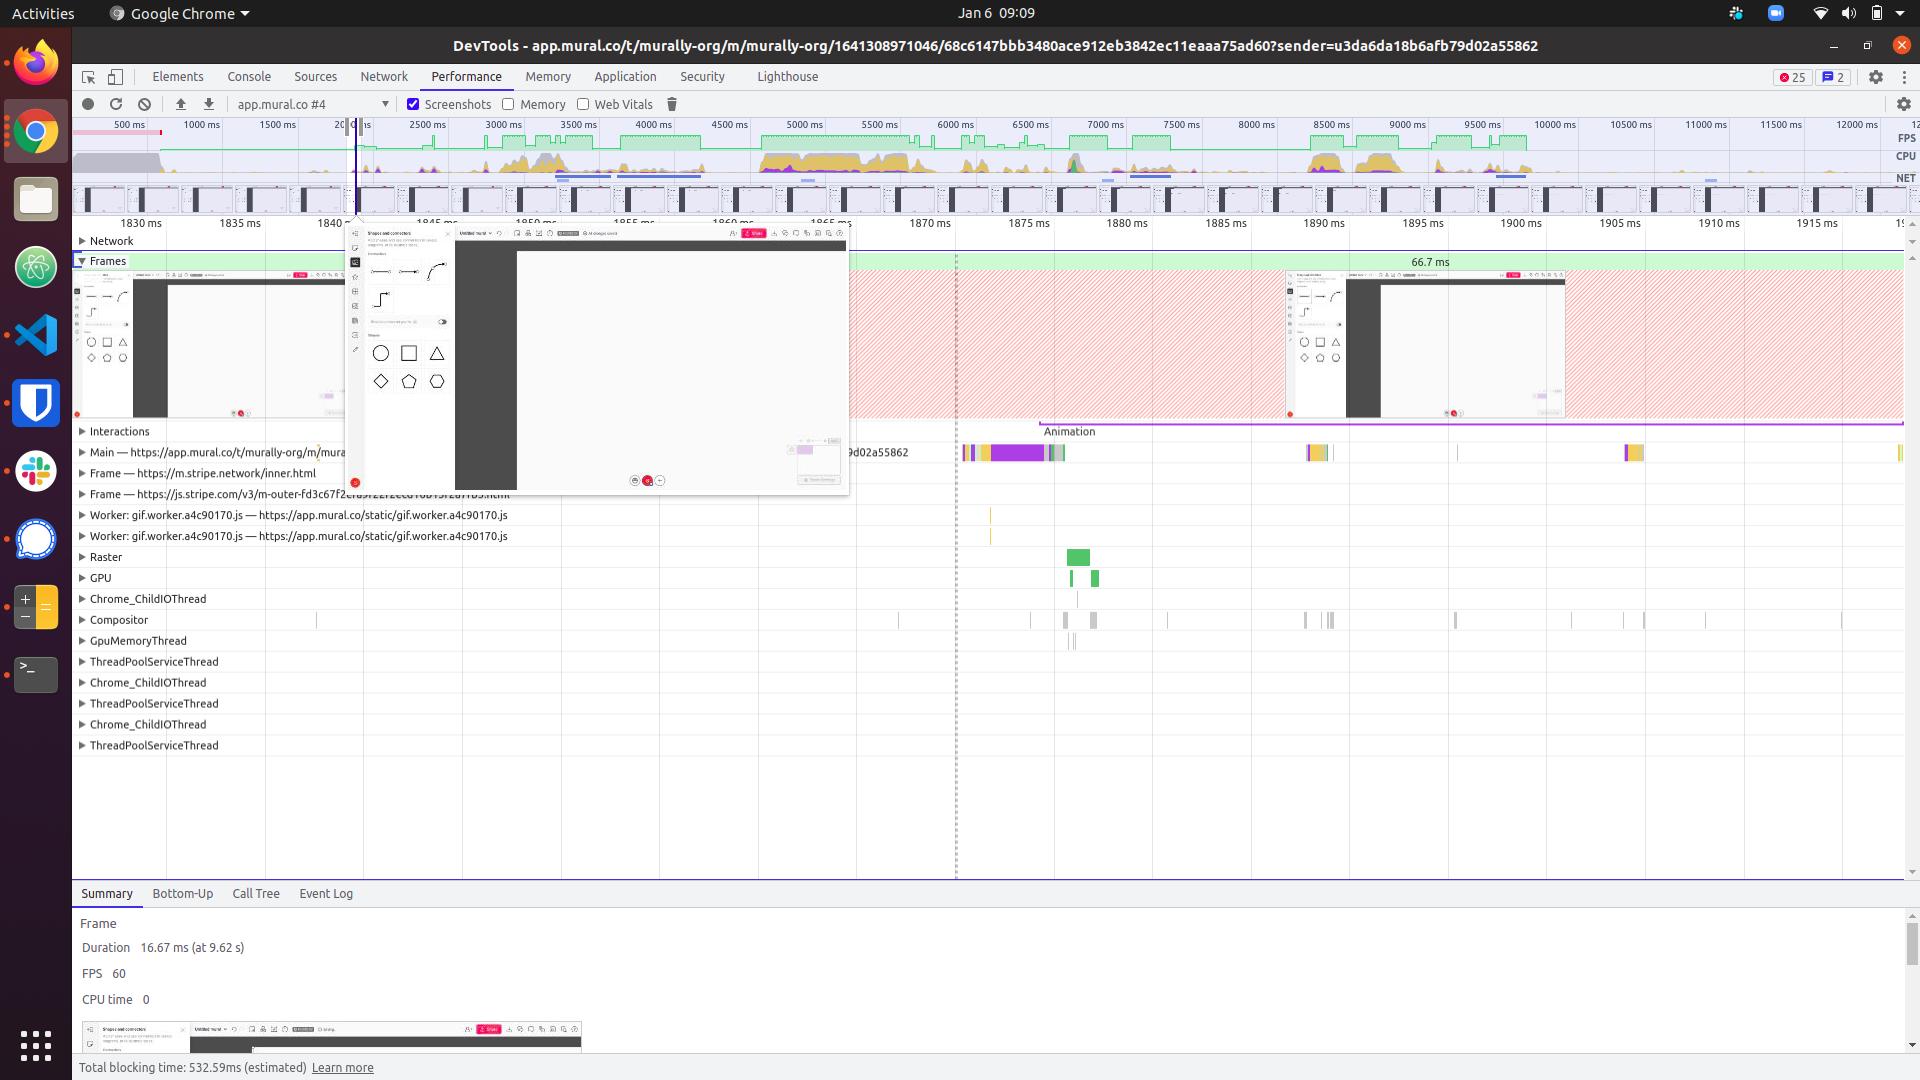
<p>Given a particular test case (say, “Create a note and type 20 characters into it”), we can measure
performance of the webapp, including FPS, how long each frame took to render, a visual indicator of
the frame, whether the frame was dropped, how many FPS the frame was running at, and the number of
milliseconds each frame took to render.</p>

<p><img src="assets/images/initial-view.png" alt="Performance measurement" /></p>

<p>The problem with this view is that there isn’t any way to aggregate this data. In other words, if I
want to put the number of frames as a value into a spreadsheet, I would have to manually click
through and count the frames. I did this for one test case and quickly realized this wasn’t going to
be an effective use of my time. What I want out of the data are the following data points for some
set of frames between X and Y offset milliseconds (from the start of the recording):</p>

<ul>
  <li>How many frames were rendered (we’ll include dropped frames here)?</li>
  <li>What the minimum FPS was across all frames?</li>
  <li>What the maximum FPS was across all frames?</li>
  <li>What the average FPS was across all frames?</li>
</ul>

<h3 id="devtools-for-devtools">DevTools for DevTools</h3>

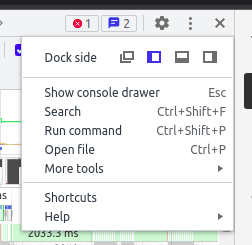
<p>Since the Chrome developer tools are just another webapp, we can actually invoke the devtools on
the devtools window. I break the devtools out into a separate window for convenience by pressing
the three vertical dots icon in the upper right corner of the devtools and selecting “Dock Side:
Undock into separate window” (the leftmost option):</p>

<p><img src="assets/images/dock-side.png" alt="Undock into separate window" /></p>

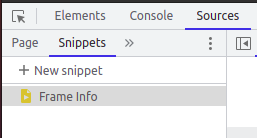
<p>Now, from this devtools window, launch <em>another</em> devtools window using <kbd>CTRL</kbd>+<kbd>SHIFT</kbd>+<kbd>i</kbd>.
From within this new devtools window, select the “Sources” tab from the top, and click the
“Snippets” tab just below that in the upper right corner. Click the line that says “New snippet”.
Name this snippet whatever you want. I’m named mine “Frame info”.</p>

<p><img src="assets/images/new-snippet.png" alt="Creating a new snippet" /></p>

<p>You’re going to put the following code into this snippet<sup id="fnref:1"><a href="#fn:1" class="footnote" rel="footnote" role="doc-noteref">1</a></sup>:</p>

<div class="language-javascript highlighter-rouge"><div class="highlight"><pre class="highlight"><code><span class="kd">let</span> <span class="nx">frames</span> <span class="o">=</span> <span class="nx">UI</span><span class="p">.</span><span class="nx">panels</span><span class="p">.</span><span class="nx">timeline</span><span class="p">.</span><span class="nx">flameChart</span><span class="p">.</span><span class="nx">model</span><span class="p">.</span><span class="nx">frameModelInternal</span><span class="p">.</span><span class="nx">frames</span><span class="p">;</span>

<span class="kd">let</span> <span class="nx">frameSet</span> <span class="o">=</span> <span class="p">[];</span>
<span class="kd">let</span> <span class="nx">startTimeMs</span> <span class="o">=</span> <span class="nx">UI</span><span class="p">.</span><span class="nx">panels</span><span class="p">.</span><span class="nx">timeline</span><span class="p">.</span><span class="nx">flameChart</span><span class="p">.</span><span class="nx">model</span><span class="p">.</span><span class="nb">window</span><span class="p">().</span><span class="nx">left</span><span class="p">;</span>
<span class="kd">let</span> <span class="nx">endTimeMs</span> <span class="o">=</span> <span class="nx">UI</span><span class="p">.</span><span class="nx">panels</span><span class="p">.</span><span class="nx">timeline</span><span class="p">.</span><span class="nx">flameChart</span><span class="p">.</span><span class="nx">model</span><span class="p">.</span><span class="nb">window</span><span class="p">().</span><span class="nx">right</span><span class="p">;</span>

<span class="kd">let</span> <span class="nx">minFPS</span> <span class="o">=</span> <span class="mi">1000</span><span class="p">;</span>
<span class="kd">let</span> <span class="nx">maxFPS</span> <span class="o">=</span> <span class="o">-</span><span class="mi">1</span><span class="p">;</span>
<span class="kd">let</span> <span class="nx">totalFPS</span> <span class="o">=</span> <span class="mi">0</span><span class="p">;</span>

<span class="k">for</span> <span class="p">(</span><span class="kd">let</span> <span class="nx">frameIdx</span> <span class="k">in</span> <span class="nx">frames</span><span class="p">)</span> <span class="p">{</span>
    <span class="kd">let</span> <span class="nx">frame</span> <span class="o">=</span> <span class="nx">frames</span><span class="p">[</span><span class="nx">frameIdx</span><span class="p">];</span>
    <span class="k">if</span> <span class="p">(</span><span class="nx">frame</span><span class="p">.</span><span class="nx">startTime</span> <span class="o">&gt;=</span> <span class="nx">startTimeMs</span> <span class="o">&amp;&amp;</span> <span class="nx">endTimeMs</span> <span class="o">&gt;=</span> <span class="nx">frame</span><span class="p">.</span><span class="nx">endTime</span><span class="p">)</span> <span class="p">{</span>
        <span class="nx">frameSet</span><span class="p">.</span><span class="nx">push</span><span class="p">(</span><span class="nx">frame</span><span class="p">);</span>
        <span class="kd">let</span> <span class="nx">frameRate</span> <span class="o">=</span> <span class="p">(</span><span class="mf">16.0</span><span class="o">/</span><span class="nx">frame</span><span class="p">.</span><span class="nx">duration</span><span class="p">)</span> <span class="o">*</span> <span class="mi">60</span><span class="p">;</span>

        <span class="k">if</span> <span class="p">(</span><span class="nx">maxFPS</span> <span class="o">&lt;</span> <span class="nx">frameRate</span><span class="p">)</span> <span class="p">{</span>
          <span class="nx">maxFPS</span> <span class="o">=</span> <span class="nx">frameRate</span><span class="p">;</span>
        <span class="p">}</span>

        <span class="k">if</span> <span class="p">(</span><span class="nx">minFPS</span> <span class="o">&gt;</span> <span class="nx">frameRate</span><span class="p">)</span> <span class="p">{</span>
          <span class="nx">minFPS</span> <span class="o">=</span> <span class="nx">frameRate</span><span class="p">;</span>
        <span class="p">}</span>

        <span class="nx">totalFPS</span> <span class="o">+=</span> <span class="nx">frameRate</span><span class="p">;</span>
    <span class="p">}</span>
<span class="p">}</span>

<span class="nx">console</span><span class="p">.</span><span class="nx">log</span><span class="p">(</span><span class="s2">`Total Frames: </span><span class="p">${</span><span class="nx">frameSet</span><span class="p">.</span><span class="nx">length</span><span class="p">}</span><span class="s2">`</span><span class="p">);</span>
<span class="nx">console</span><span class="p">.</span><span class="nx">log</span><span class="p">(</span><span class="s2">`Min FPS: </span><span class="p">${</span><span class="nx">minFPS</span><span class="p">}</span><span class="s2">`</span><span class="p">);</span>
<span class="nx">console</span><span class="p">.</span><span class="nx">log</span><span class="p">(</span><span class="s2">`Max FPS: </span><span class="p">${</span><span class="nx">maxFPS</span><span class="p">}</span><span class="s2">`</span><span class="p">);</span>
<span class="nx">console</span><span class="p">.</span><span class="nx">log</span><span class="p">(</span><span class="s2">`Average FPS: </span><span class="p">${</span><span class="nx">totalFPS</span> <span class="o">/</span> <span class="nx">frameSet</span><span class="p">.</span><span class="nx">length</span><span class="p">}</span><span class="s2">`</span><span class="p">);</span>
</code></pre></div></div>

<p>Note the <code class="language-plaintext highlighter-rouge">startTimeMs</code> and <code class="language-plaintext highlighter-rouge">endTimeMs</code> variables at the top. You’ll need to adjust the window of the
performance profile to encapsulate where the data you want is located. How to do this is discussed
in the next section.</p>

<h3 id="usage">Usage</h3>
<p>Now that we have our snippet in the Chrome devtools-for-devtools, it’s time to use it to get the
metrics we want. Here’s a brief list of steps to accomplish this<sup id="fnref:2"><a href="#fn:2" class="footnote" rel="footnote" role="doc-noteref">2</a></sup>:</p>

<ol>
  <li>Open up the original web application window and do anything you need to prepare for the performance capture session (e.g. log in, arrange whatever you need so that you can capture performance data of <em>just</em> what you want).</li>
  <li>Open up the “devtools1” window and click the “Performance” tab, then click the little record button in the upper left corner to start the performance recording session.</li>
  <li>Go back to the web app window and perform whatever you are looking to profile.</li>
  <li>Navigate back to the devtools1 window and stop the performance session. Wait for it to finish processing the profile.</li>
  <li>Find the start and end times (in ms) for the session (discussed in detail below).</li>
  <li>Click <kbd>CTRL</kbd>+<kbd>Enter</kbd> to run the snippet and output your data to the console log.</li>
</ol>

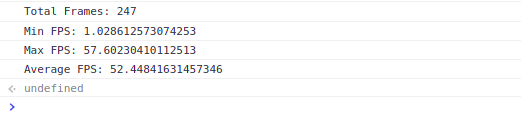
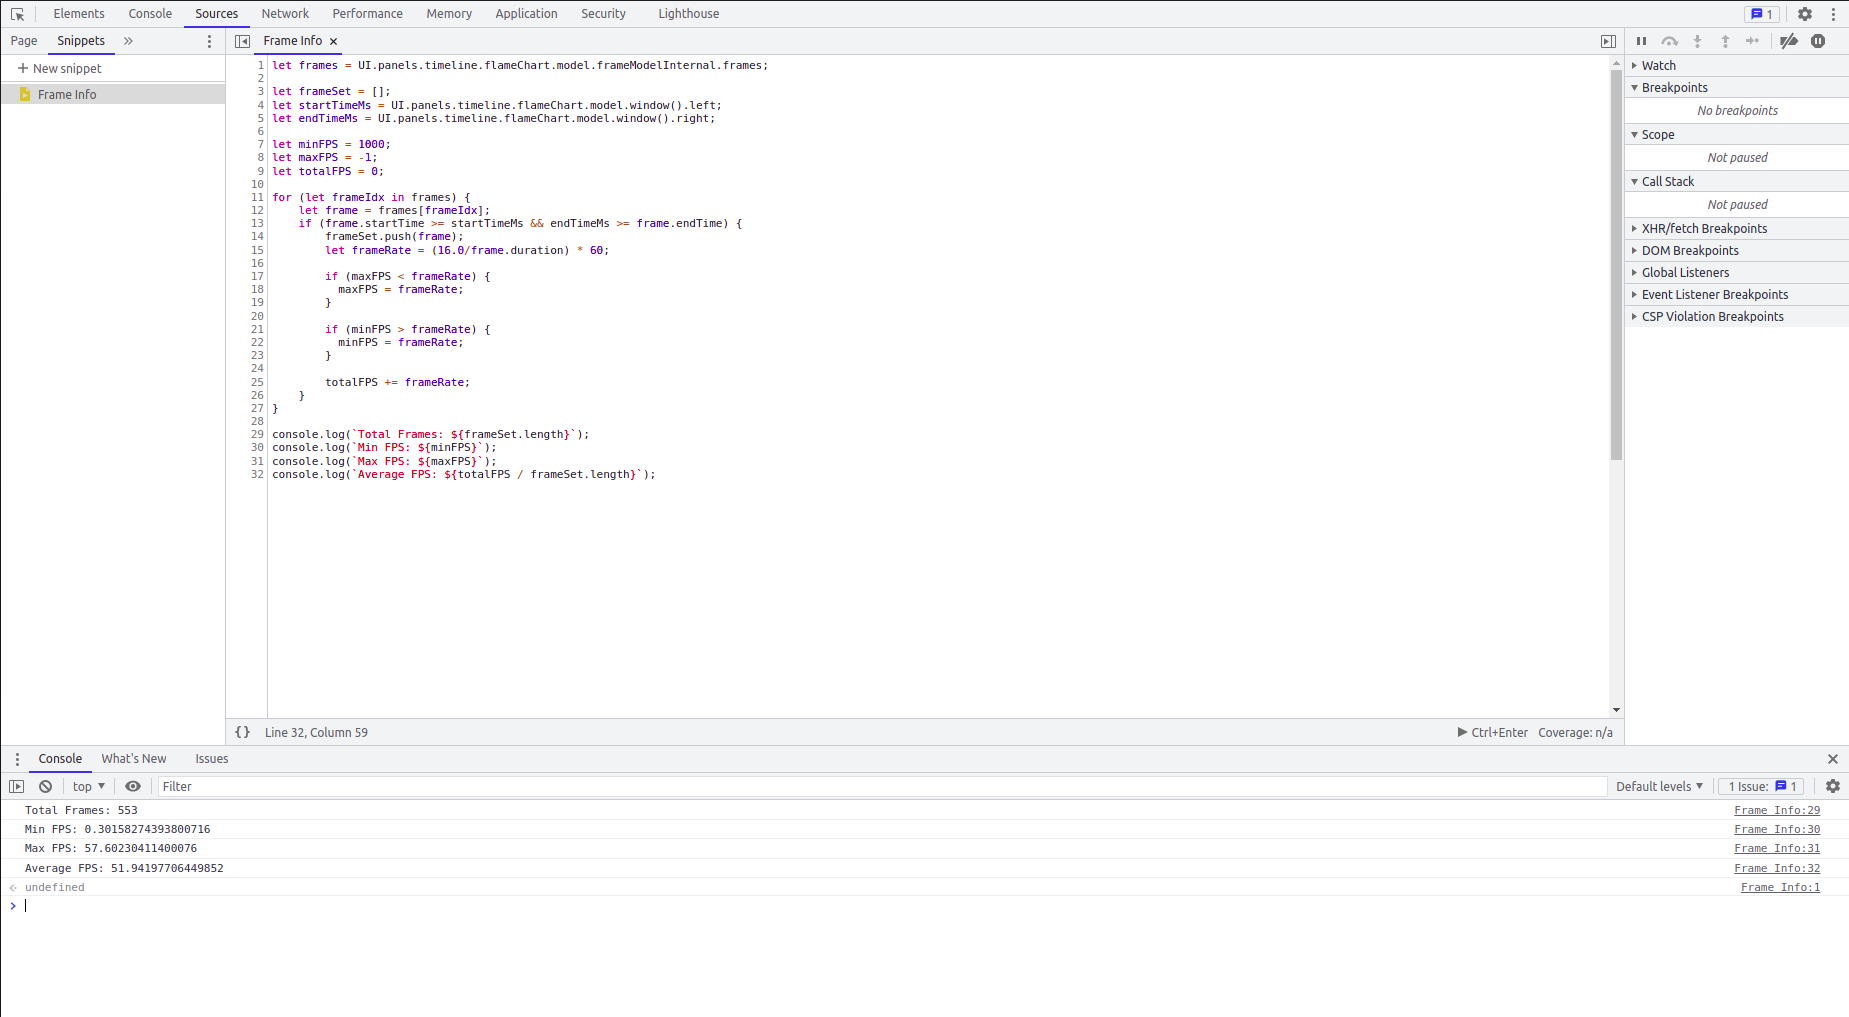
<p>If these steps are performed successfully, you should see something like the following in your
console log:</p>

<p><img src="assets/images/frame-stats.png" alt="Result of our script" /></p>

<h3 id="finding-the-start-and-end-times">Finding the start and end times</h3>
<p>You <em>can</em> just use a <code class="language-plaintext highlighter-rouge">startTimeMs</code> of <code class="language-plaintext highlighter-rouge">0</code> and an <code class="language-plaintext highlighter-rouge">endTimeMs</code> of whatever the length of your profile
was, in milliseconds (which is the default), <em>but</em>, it’s often the case that you take a long profile
and don’t really want all of the data. A reason for this might be that you spend a second or two at
the beginning fiddling around before what you actually want to track, or perhaps you get interrupted
at the very end of your profile by your wife bringing you coffee and forget to stop the profile
right away.</p>

<p>In these cases, I’ve found one way to tell where the “real” profile starts and ends is to take a
look at the “Frames” section of the profile and highlight a window to bound the profile. In the
following image, I can see, from the frame images, that the task I’m looking to complete doesn’t
<em>actually</em> start until about 1830ms:</p>

<p><img src="assets/images/starting-frame.png" alt="Starting Frame" /></p>

<p>You can click and drag on either end of the window (sometimes the little handles are difficult to
see) to adjust what is included in the window. Once you adjust the window, you can go back to the
script view and run the script to get the data you want.</p>

<p><img src="assets/images/re-run-script-from-devtools.png" alt="Re-running the script" /></p>

<h3 id="conclusion">Conclusion</h3>
<p>Hopefully, this gave you a decent introduction into how to use devtools for devtools to glean FPS
and frame statistics from a performance profile. There are other things you can do with the <code class="language-plaintext highlighter-rouge">UI</code>
data structure, so experiment! Getting frame statistics is just the tip of the iceberg, so feel free
to write in the comments any useful snippets for your work.</p>

<h3 id="footnotes">Footnotes</h3>
<div class="footnotes" role="doc-endnotes">
  <ol>
    <li id="fn:1">
      <p>I got most of this code thanks to <a href="https://stackoverflow.com/questions/48079661/how-to-get-the-fps-in-chrome-devtools">this StackOverflow post</a>, but it’s been edited a bit. The API for the devtools-for-devtools doesn’t seem to be <em>quite</em> the same as it was when that post was written. <a href="#fnref:1" class="reversefootnote" role="doc-backlink">&#8617;</a></p>
    </li>
    <li id="fn:2">
      <p>For brevity, I’m going to stop referring to ‘devtools-for-devtools’ and instead refer to ‘devtools1’ as the devtools window we originally opened on our web application we wanted to take readings for and ‘devtools2’ as the devtools-for-devtools window we opened last. <a href="#fnref:2" class="reversefootnote" role="doc-backlink">&#8617;</a></p>
    </li>
  </ol>
</div>]]></content><author><name>jwir3</name></author><category term="Engineering" /><category term="Software Development" /><category term="Graphics" /><summary type="html"><![CDATA[I’ll let you in on a little secret: Chrome’s devtools are essentially just another webapp. This means that you can check out data from the devtools in another devtools instance.]]></summary></entry><entry><title type="html">Setting Up an Existing Yubikey on Linux</title><link href="/setting-up-an-existing-yubikey-on-linux" rel="alternate" type="text/html" title="Setting Up an Existing Yubikey on Linux" /><published>2021-08-19T06:00:00+00:00</published><updated>2021-08-19T06:00:00+00:00</updated><id>/setting-up-an-existing-yubikey-on-linux</id><content type="html" xml:base="/setting-up-an-existing-yubikey-on-linux"><![CDATA[<p>Yesterday, I ran into an issue with Pop! OS that resulted in me having to reinstall my operating
system. I use a Yubikey for my SSH keys and to sign git commits, so it was necessary to set this up
again. <a href="https://github.com/drduh/YubiKey-Guide">DrDuh</a> has a very comprehensive guide on how to set
up Yubikeys on multiple platforms.</p>

<p>However, I didn’t want to setup a new Yubikey - I already had the Yubikey that I used from the
previous installation of my operating system. As such, I wanted to get this Yubikey working. The
steps are pretty simple:</p>

<p>First, install the required software:</p>

<div class="language-shell highlighter-rouge"><div class="highlight"><pre class="highlight"><code><span class="nb">sudo </span>apt <span class="nt">-y</span> <span class="nb">install </span>wget gnupg2 gnupg-agent dirmngr cryptsetup
<span class="nb">sudo </span>apt <span class="nt">-y</span> <span class="nb">install </span>scdaemon pcscd secure-delete hopenpgp-tools yubikey-personalization
</code></pre></div></div>

<p>Next, install the <code class="language-plaintext highlighter-rouge">ykman</code> utility:</p>

<div class="language-shell highlighter-rouge"><div class="highlight"><pre class="highlight"><code><span class="nb">sudo </span>apt <span class="nt">-y</span> <span class="nb">install </span>python3-pip python3-pyscard
pip3 <span class="nb">install </span>PyOpenSSL
pip3 <span class="nb">install </span>yubikey-manager
<span class="nb">sudo </span>service pcscd start
</code></pre></div></div>

<p>After this, you’ll need to configure your <code class="language-plaintext highlighter-rouge">gpg-agent</code> by adding the following to
<code class="language-plaintext highlighter-rouge">~/.gnupg/gpg.conf</code>:</p>

<div class="language-plaintext highlighter-rouge"><div class="highlight"><pre class="highlight"><code>auto-key-locate keyserver
comment GPGTools - https://gpgtools.org
cert-digest-algo SHA512
default-preference-list SHA512 SHA384 SHA256 SHA224 AES256 AES192 AES CAST5 ZLIB BZIP2 ZIP Uncompressed
personal-digest-preferences SHA512 SHA384 SHA256 SHA224
</code></pre></div></div>

<p>And the following to <code class="language-plaintext highlighter-rouge">~/.gnupg/gpg-agent.conf</code> (note, if desired you can change the
<code class="language-plaintext highlighter-rouge">pinentry-program</code> to something else if you don’t want the gnome3 popup to come up):</p>

<div class="language-plaintext highlighter-rouge"><div class="highlight"><pre class="highlight"><code>enable-ssh-support
ttyname $GPG_TTY
default-cache-ttl 60
max-cache-ttl 120
pinentry-program /usr/bin/pinentry-gnome3
</code></pre></div></div>

<p>You also will need to set up the <code class="language-plaintext highlighter-rouge">gpg-agent</code> instead of the default <code class="language-plaintext highlighter-rouge">ssh</code> agent to run when your
shell starts. To do this, you can place this in your <code class="language-plaintext highlighter-rouge">.bashrc</code> or <code class="language-plaintext highlighter-rouge">.zshrc</code> file:</p>

<div class="language-plaintext highlighter-rouge"><div class="highlight"><pre class="highlight"><code># Make gpg-agent replace SSH agent
export GPG_TTY="$(tty)"
export SSH_AUTH_SOCK=$(gpgconf --list-dirs agent-ssh-socket)
gpgconf --launch gpg-agent
</code></pre></div></div>

<p>Finally, you need to restart the <code class="language-plaintext highlighter-rouge">gpg-agent</code>:</p>

<div class="language-shell highlighter-rouge"><div class="highlight"><pre class="highlight"><code>gpgconf <span class="nt">--launch</span> gpg-agent
</code></pre></div></div>]]></content><author><name>jwir3</name></author><category term="git" /><category term="Yubikey" /><category term="Security" /><summary type="html"><![CDATA[Yesterday, I ran into an issue with Pop! OS that resulted in me having to reinstall my operating system. I use a Yubikey for my SSH keys and to sign git commits, so it was necessary to set this up again. DrDuh has a very comprehensive guide on how to set up Yubikeys on multiple platforms.]]></summary></entry><entry><title type="html">Pro Tip: Steal Like an Artist</title><link href="/pro-tip-steal-like-an-artist" rel="alternate" type="text/html" title="Pro Tip: Steal Like an Artist" /><published>2021-03-11T06:00:00+00:00</published><updated>2021-03-11T06:00:00+00:00</updated><id>/pro-tip-steal-like-an-artist</id><content type="html" xml:base="/pro-tip-steal-like-an-artist"><![CDATA[<p>I was speaking with a colleague at a different company yesterday, and she gave me some advice that
I thought was really interesting. It involves stealing ideas legitimately.</p>

<blockquote>
  <p>Whenever we have a difficult problem that needs to be solved by an API and I’m not sure how to
tackle the API or how it should be presented to the client, I ask myself “How would Stripe
implement this API?”</p>
</blockquote>

<p>Sounds pretty simple, right? <a href="https://stripe.com/">Stripe</a>, I would argue, is pretty universally
recognized as a great API to work with, so emulating them is probably a great pathway to success.
Obviously, this doesn’t work 100% of the time - if you’re blazing a completely new path, then you’re
probably not going to have an existing API to crib from. That said, I suspect at least a portion of
what you’re doing has already been done before, and learning to think the way of those that came
before you will benefit you.</p>

<p>This isn’t my idea, by the way. As you can probably tell from the title, it’s an idea that comes
from the book <a href="https://www.amazon.com/Steal-Like-Artist-Things-Creative/dp/0761169253/ref=sr_1_1?dchild=1&amp;keywords=steal+like+an+artist&amp;qid=1615489873&amp;sr=8-1">Steal Like an Artist: 10 Things Nobody Told You About Being Creative</a>. I highly recommend this book - it’s a
fantastic read, and gives a lot of insight into how you should think about creative work. Further,
it alleviates guilt about taking ideas from others (since we all do it anyway).</p>]]></content><author><name>jwir3</name></author><category term="Creative" /><category term="Art" /><summary type="html"><![CDATA[I was speaking with a colleague at a different company yesterday, and she gave me some advice that I thought was really interesting. It involves stealing ideas legitimately.]]></summary></entry><entry><title type="html">Containers, Composers, and Orchestrators</title><link href="/containers-composers-and-orchestrators" rel="alternate" type="text/html" title="Containers, Composers, and Orchestrators" /><published>2021-02-14T06:00:00+00:00</published><updated>2021-02-14T06:00:00+00:00</updated><id>/containers-composers-and-orchestrators</id><content type="html" xml:base="/containers-composers-and-orchestrators"><![CDATA[<p>Containerization can be a difficult concept to wrap one’s head around, simply because of the
commonality of the different terms involved. To remedy this problem, I recently decided to solidify
some of this terminology with an analogy.</p>

<p><em>Containers</em> are a pretty popular topic right now in software development and the sub-area of
software development we often call DevOps. As a software developer, I’ve heard of the benefits of
virtualization/containerization and actually experienced it first-hand at some of the companies I’ve
worked for. That said, I’ve found containerization a difficult concept to wrap my head around,
because of the commonality of the different terms involved.</p>

<p>To remedy this problem (arguably perhaps only a problem in my own mind), I recently decided to
solidify some of this terminology, and discovered a pretty interesting analogy on
<a href="https://stackoverflow.com/a/62893102/281460">this StackOverflow answer</a> that I thought I would
share.</p>

<p>Essentially, the analogy is the following:</p>

<ul>
  <li><strong>Containers</strong> are lightweight, isolated, self-contained packages of software that provide a service, as well as all that service’s dependencies. You can think of these as containers on a cargo ship - they are isolated from all other containers on the ship, and provide a set of something that is completely self-contained (the products being shipped). They may or may not have any relation to any other container(s) on the ship.</li>
  <li><strong>Composers</strong> or <strong>clusters</strong> (I use this term as a general noun, but really, we’re talking about <code class="language-plaintext highlighter-rouge">docker-compose</code> here) are tools for defining and running applications using multiple containers. In the analogy above, a composer is similar to the ship on which containers are loaded. The captain of the ship (i.e. the <code class="language-plaintext highlighter-rouge">docker-compose.yml</code> file) is responsible for placing containers in a specific area of the ship, starting/stopping them, and managing access to them. Typically, clusters will have numerous containers running on the same machine.</li>
  <li><strong>Orchestrators</strong>, or <strong>Orchestration Frameworks</strong>, such as Kubernetes or Docker Swarm, are used to manage multiple clusters. You can think of these as the harbor master, or port authority, in the above analogy. It is the responsibility of this authority to manage multiple ships, each interacting with each other, as well as schedule arrivals and departures. The orchestration framework typically manages multiple clusters across several physical hosts.</li>
</ul>

<p>One thing to keep in mind - while in the analogy, it’s necessary to have a separation between
orchestrators and composers, the composer level really isn’t necessary. Kubernetes is actually the
Greek word for “helmsman”, indicating the captain of a ship. While Kubernetes can be used as a
composer, it’s not really possible for <code class="language-plaintext highlighter-rouge">docker-compose</code> to perform all of the same tasks as
Kubernetes.</p>

<p>This is a simplified example, and of course, has its limitations, but I felt that it helped me
understand this complex interaction of systems a little better. Of course, I’m still learning, so
it’s possible some of the things in this blog post aren’t correct (i.e. take my opinion and
knowledge with a grain of salt).</p>]]></content><author><name>jwir3</name></author><category term="docker" /><category term="containers" /><summary type="html"><![CDATA[Containerization can be a difficult concept to wrap one’s head around, simply because of the commonality of the different terms involved. To remedy this problem, I recently decided to solidify some of this terminology with an analogy.]]></summary></entry><entry><title type="html">How I Write a Commit Message</title><link href="/how-I-write-a-commit-message" rel="alternate" type="text/html" title="How I Write a Commit Message" /><published>2019-06-26T06:00:00+00:00</published><updated>2019-06-26T06:00:00+00:00</updated><id>/how-I-write-a-commit-message</id><content type="html" xml:base="/how-I-write-a-commit-message"><![CDATA[<p>How I write a commit message for version control systems, and why this even matters in the first
place when you’re just trying to get patches out the door.</p>

<h2 id="introduction">Introduction</h2>

<p>This is a topic that has been covered at length in other blog posts (most notably
<a href="https://chris.beams.io/posts/git-commit/">Chris Beams’ blog post</a>), but it’s important, so it bears
repeating. When you’re working on a large software project, it makes everyone’s life (including
yours) much easier if you write consistent, descriptive, and easily readable commit messages.</p>

<p>Software engineering is tough. You spend all day (or multiple days) getting your feature/bug fix
mapped out, writing the code, debugging said code, writing tests to verify that nothing is broken in
the future, and then, after all of that, you have to craft your commit(s). It’s very tempting to let
your discipline lapse and just write something half-baked without thinking too much about it, just
so you can get that task into the “Done” state.</p>

<p>Here’s the kicker, though: someday, you’re likely going to have to go back and review that commit
message. If, for no other reason, you may want to go through your git repository to see what you’ve
accomplished since your last performance review. Going through a git commit log like this (Yeah,
this is a real snippet from a commit log that I wrote. The worst part is that those commit messages
are all there is. There’s no additional description in any of them):</p>

<div class="language-plaintext highlighter-rouge"><div class="highlight"><pre class="highlight"><code>85dd75c refactor interfaces so they are all in the same format
2af1c6d add code for branching model
d3b2606 Merge branch 'glsl'
3a6bed2 add necessary graphics libraries
d028509 fix issue #17261
2367d80 more work toward full implementation
2067b23 add cpp files
a111bff makefile generation
14a715e create repo
</code></pre></div></div>

<p>Is much more work than going through a commit log like this:</p>

<div class="language-plaintext highlighter-rouge"><div class="highlight"><pre class="highlight"><code>61c70bc Add a configuration to ripsaw.
8af4151 Merge pull request #7 from jwir3/jwir3/#3-cut-list
9d05854 Add a CutList data structure.
74a21ae Merge pull request #5 from jwir3/main-ui
4be2728 Add a basic user interface for binary program.
de4061d Refactor measurements functionality into its own rust file.
15cc8e1 Merge pull request #1 from jwir3/basics
a6c6010 Add the ability to create nominal and actual lumber sizes.
6a1e1fd Initial commit
</code></pre></div></div>

<p>I can tell <em>exactly</em> what was changed in each of the commit messages from the latter example.</p>

<p>Moreover, this is your work. You’ve put in the hours necessary to make this code work. The git
commit message is your advertisement of the work you’ve accomplished. It’s the thing most of your
colleagues are going to see that has your name attached, since, as we’re working in code from
day-to-day, we typically see the code, not the person who wrote it. Take pride in your work - this
is your opportunity to “sell” it to your colleagues!</p>

<h2 id="the-rules">The Rules</h2>

<p>There are three basic rules I follow (with an additional, optional one at the very beginning):</p>

<ol>
  <li>(Optional) Choose a gitmoji to represent your commit</li>
  <li>Add a simple subject in the imperative mood, starting with a capital letter, no more than 80 characters in length, and separated from the body by a blank line.</li>
  <li>Write a body message describing what was accomplished in the commit, as well as why it was necessary, wrapped at 80 characters in length, separated from the metadata with a blank line.</li>
  <li>Add all metadata (e.g. ticket numbers, CI commands, etc…) at the end of the commit message.</li>
</ol>

<h3 id="choose-a-gitmoji-to-represent-your-commit">Choose a gitmoji to represent your commit</h3>

<p>I’ve found that reading commit logs (especially one-line logs) can be made much simpler with an
emoji that describes the category of change that the commit falls under. I personally use <a href="https://gitmoji.dev/">gitmoji</a>,
an informal standard for which types of commits use which emoji, but you can really use anything you
want, as long as you’re consistent.</p>

<p>By adding something like <code class="language-plaintext highlighter-rouge">:bug:</code> before your commit, it’s pretty clear every time you read it that
this commit fixed a bug. I find it helps with parsing, but you have to be willing to add some helper
packages so that git log works on the command line.</p>

<h3 id="add-a-simple-subject">Add a simple subject</h3>

<p>In the manpage for <code class="language-plaintext highlighter-rouge">git-commit</code>, the following argument is made:</p>

<blockquote>
  <p>DISCUSSION</p>

  <p>Though not required, it’s a good idea to begin the commit message with a single short (less than
50 character) line summarizing the change, followed by a blank line and then a more thorough
description. The text up to the first blank line in a commit message is treated as the commit
title, and that title is used throughout Git. For example, git-format-patch(1) turns a commit
into email, and it uses the title on the Subject line and the rest of the commit in the body.</p>
</blockquote>

<p>I’ve personally found that 50 characters is a little short, although, I can see the point if you’re
reviewing patches via email. Github seems to truncate the subject line of a commit at 72 characters,
so that’s worth keeping in mind, too. I set my vim editor (which is what I use to write commit
messages) to show a vertical line and automatically add a newline at 80 characters. It’s somewhat of
an arbitrary limit, but I don’t think that 50 or 72 characters is quite enough, personally, and 80
character line limits seem to be a standard.</p>

<p>I think the idea behind the 50 character limit is that when in a terminal with an 80 character line
length limit, the sha of the commit and it’s trailing space require 10 characters on average, but
they can require up to 41 characters (40 for the sha itself, plus 1 for the space), thus you really
only have 80 - 41 = 39 characters of actual message length. I think, though, that most terminals
aren’t limited to 80 characters anymore, so this is somewhat moot. Instead, it’s a discipline thing:
you should be disciplined enough as an engineer to be able to summarize your changes in 50
characters or less.</p>

<p>That said, here’s my argument against limiting yourself to 50 characters: first off, we live in a
society that is becoming more and more conditioned to brief communications (think news headlines and
tweets). In most cases, the ideal spot for a news headline is 60-100 characters [^2]. 80 characters
is a good middle ground in that range for people to be able to digest.</p>

<p>A commit subject should be in the imperative mood. What this essentially means is that it should
complete the sentence <strong>When this commit is applied, it will ___________________.</strong> Think about how
easy to read this is when it’s properly written in this manner. It also helps you, as an engineer
crafting the commit, to know if you’ve overstepped the bounds of a commit changing a single related
and cohesive thing, rather than changing a bunch of things that are unrelated.</p>

<p>One other detail about the subject that might be controversial: I actually add a period to the end
of my commit messages. The reason I do this is because, in my opinion, the subject line of the
commit should be a complete sentence. I find messages easier to read and parse when proper
punctuation is used, but this is just me.</p>

<h3 id="write-a-body-message">Write a body message</h3>

<p>It’s important to add descriptive data as to what, specifically, was changed in your commit
(beyond the limit of your subject line). I’ve found, though, that more important is the
justification for this change. In six months, you might come back to this commit, realize that you
changed a file or a class, but you might not remember why that change was necessary. The body also
gives you room to express yourself using lists, bullets, links, or, in some cases (depending on your
organization’s policies) full markdown.</p>

<p>It is worth noting that not every commit requires a subject line and a body. Sometimes, if the
subject line is absolutely clear, it’s worth just leaving the body blank. I also do this if it’s a
merge commit, but I will sometimes add the metadata section to indicate who reviewed my merge:</p>

<div class="language-plaintext highlighter-rouge"><div class="highlight"><pre class="highlight"><code>commit a2f525f01bf657b706fd2f39bbf704aa7b9c4a69
Merge: d9f74c1fd 4530a7243
Author: Scott Johnson &lt;jaywir3@gmail.com&gt;
Date: Mon May 13 16:22:45 2019 -0500

    Merge pull request #5616 from jwir3/bump-versions-package-may19

    [r=VerteDinde, coreh]
</code></pre></div></div>

<h3 id="add-all-metadata-at-the-end-of-the-commit-message">Add all metadata at the end of the commit message</h3>

<p>We all have things that we need to add to a commit - ticket numbers, references to other commits,
who reviewed a given commit, etc… This metadata should be placed at the end of the commit message.
The rationale for this is that this tends to be things that are either required by a continuous
integration system (e.g. it should be machine-readable, rather than human-readable), or is ancillary
information not directly related to the commit in question (i.e. if your commit is readable enough,
why bother going to the original ticket for more information? You should be able to find the answer
to your question within the git log itself).</p>

<p>Thus, I tend to organize my data in a commit in a linear fashion, with the information I’m most
likely to want coming first, in this order:</p>

<ol>
  <li>What category this commit fits into</li>
  <li>What this commit changes</li>
  <li>A thorough explanation of what was changed and why it was necessary</li>
  <li>Any ancillary metadata that helps me locate more information if this wasn’t enough</li>
</ol>

<h2 id="a-config-to-help-you">A Config to Help You</h2>

<p>I find the following commit template configuration helpful as a reminder of this. Just put the file
into <code class="language-plaintext highlighter-rouge">~/.gitmessage</code> and it will show up for you every time you enter the editor after running <code class="language-plaintext highlighter-rouge">git
commit</code>:</p>

<div class="language-plaintext highlighter-rouge"><div class="highlight"><pre class="highlight"><code># When applied, this commit will:

# This change is necessary because:

# The following is metadata for this commit:
</code></pre></div></div>

<h2 id="how-can-i-get-my-organization-to-do-this">How can I get my organization to do this?</h2>

<p>There’s a small part of this that I’ve glossed over that makes this all worthwhile. It’s only
somewhat beneficial if you’re the only one in your organization doing this. How can you get
engineers from across the organization writing commits like this?</p>

<p>Part of the answer to this questions is: <strong>You can’t</strong>. It’s not possible to control other people’s
behavior completely, so you should temper your expectations. People will do things that they believe
have value, so if they don’t think that writing commit messages in this way has value, they won’t do
it. There are ways to encourage them to see value in it, though.</p>

<p>I’ve found that around 85% of organizations I’ve been a part of don’t have any documentation on how
to write commit messages. If, however, your organization is part of the 15% that does have a
tandardized way of writing commit messages, by all means, follow those rules. Otherwise, what I do
is to keep in mind a couple of things:</p>

<ol>
  <li>The other person isn’t you. They have different expectations from their higher-ups (and themselves), so it’s not a great idea to try to force upon them a standard that you simply create out of thin air.</li>
  <li>Some small things (like the difference between an 80-character subject line and a 50-character subject line) are ideological battles that aren’t worth fighting over. If that’s the sticking point between you and a colleague, just let them do it however they want, as long as the benefit is still present.</li>
</ol>

<p>Now, on to the techniques for encouraging this behavior. I find that <em>code review</em> and <em>micro-rewards</em>
are a great way to encourage the writing of great commit messages. Most organizations have some form
of code review process. This is a great place to enforce commit message practices. One thing to be
careful about, though, is to not become too dictatorial. If I see a commit message that could be
improved during a code review, I will often consider re-writing the commit message for the person in
question, and posting that as a suggested change in the code review. Additionally, not everyone
knows how to use git rebase (see also <a href="/rebasing-towards-independence">Rebasing Toward Independence</a>),
so it’s worth it to add a comment detailing how they change their commit message in the code review,
as well.</p>

<p>Keep in mind that you can always <em>suggest</em> the change be made, but unless the commit message is
really nondescriptive, I typically wouldn’t hold up a code review solely on that front. Over time,
it will become clear in the log which engineers take the time to write a good commit message and
which ones don’t. Once other engineers are onboard and have to work with the commit messages another
person is creating, peer pressure will eventually win out.</p>

<p>The other option that I use is <em>micro-rewards</em>. This is specific to an individual company, but some
companies utilize a platform like <a href="https://bonusly.com/">bonus.ly</a> to enable employees to reward
each other over the course of a month. If I see a commit message that really stands out in a good
way, I’ll go out of my way to reward that individual publicly so that everyone knows I appreciate
that.</p>

<p>The downside to this, of course, is that your company needs to subscribe to the service in order for
you to do this. You can, however, bring good commits up during retrospective meetings, during
stand-ups, or even just in Slack on a good day, complimenting someone publicly about their commit
messages. Stay away from chastising people who aren’t doing what you want publicly, as that doesn’t
tend to work well in getting people to change their behavior, and usually makes <em>you</em> look bad.</p>

<p>In all, you can’t force someone to do what you want them to do, but you can encourage the path you
think is the correct one.</p>]]></content><author><name>jwir3</name></author><category term="Engineering" /><category term="Software Development" /><category term="git" /><summary type="html"><![CDATA[How I write a commit message for version control systems, and why this even matters in the first place when you’re just trying to get patches out the door.]]></summary></entry></feed>